
An OST (Outlook Offline Storage Table) file is a data file associated with Microsoft Outlook. It is used when you have an Exchange Account and users want to work offline owing to certain factors like travelling or any other reason. OST used by Microsoft Outlook to store a copy of your mailbox content, including emails, contacts, and calendar items. This local copy allows you to access your email data even when you’re offline, making it a valuable resource for professionals and individuals.
Microsoft Outlook 2016 is a widely used email client that is used to manage emails, calendars and other relevant data. In this blog, we will dive deep to explore the full potential of the OST files. We will also discuss how to open OST files in Outlook 2016. This post will not only enhance your knowledge regarding email management but will also offer you systematic insights into seamlessly incorporating OST files into your Outlook profile.
Benefits of OST file for the Exchange Outlook users
- Ability to Work Offline: Opening OST files in Outlook 2016 improves productivity as it enables users to access and work with their mailbox data even when there is no Internet connectivity.
- Archived Data Access: OST files prompts users to revisit past emails, appointments, and other vital information.
- Data Backup: OST files facilitate the creation of efficient backups. Users can restore their mailbox data using these backups.
- Multiple Device Collaboration: Synchronization capabilities of Outlook 2016 enable seamless collaboration across multiple devices.
How to Open the OST File in Outlook 2016
Opening an OST file in Microsoft Outlook 2016 involves following steps:
Note: These steps are only applicable when the user still has access to their Outlook account.
1. Launch Outlook and go to Import Export Wizard
- Open Microsoft Outlook 2016. Click on the “File” tab in the top left corner of the Outlook window. Click on ‘Open & Export’ and select ‘Import/ Export’ from the options.

- Click on the “Export a File” option and Click Next
- Select the “Outlook PST option” or “CSV” option and click on Next
- Now you can select the folders to export the data
- Browse the location to save the converted PST file and Click Finish.

Why you need to convert OST to PST
Sometimes we need to convert OST to PST. There are basic approaches for OST to PST conversion. The first one is a manual approach. This method uses Outlook’s built-in features, such as the Import/Export wizard, to bring the OST file into Outlook. With this approach, you can choose “Import from another program or file,” select the OST file, and follow the on-screen instructions. While manual methods are accessible and suitable for many users, they might be time-consuming and less efficient, particularly when they have access of Outlook profile.
The second method is the software method. In this approach, we use specialized third-party tools or converters like Stellar Converter for OST to convert inaccessible OST files to the PST (Outlook Data File) format seamlessly. Without any bias, we want to convey that Stellar Converter for OST simplifies the conversion process.
Stellar Converter for OST is a reliable and effective tool designed to provide effortless access to your email messages, contacts, calendar events, and other mailbox information across various Outlook versions. It simplifies the OST to PST conversion process, eliminating the challenges associated with manual methods, while prioritizing data integrity and compatibility. Whether your OST file is from an earlier Outlook version or the latest one, Stellar Converter for OST seamlessly handles the conversion, ensuring a smooth and trouble-free transition.
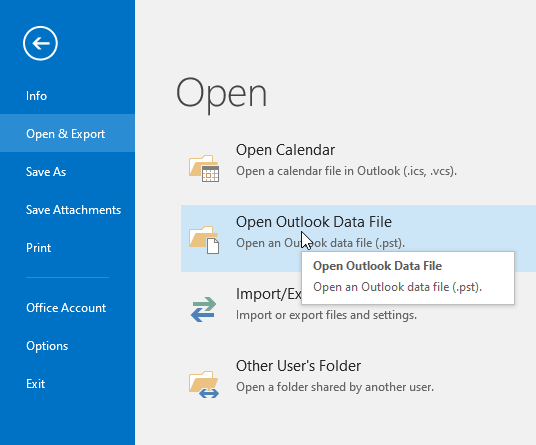
How import PST file in Outlook
1. Select Outlook Data File
- Since your OST is now converted to PST file , you should select the PST option from File >> Open & Export >> Open Outlook Data File(.pst)
2. Select the PST file from desired location
- Outlook will ask you to Select the converted PST file from the desired location
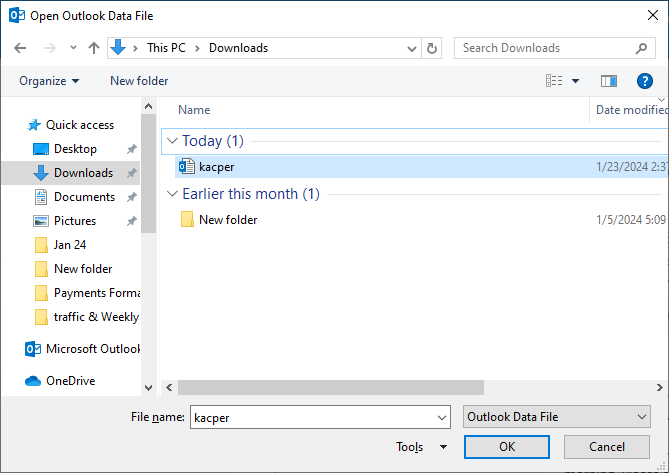
3. Finish
Click “OK” to complete the process.
4. Restart Outlook 2016
Close and restart Outlook for the changes to take effect.
Conclusion
With the above-shared methods, you can easily import OST file added to your Outlook profile. You can now access the mailbox data stored in the OST file. However, you need to ensure that you have appropriate permissions to access the data. If the OST file is associated with a different Exchange account, you require appropriate permissions to access its contents.
From the above discussion, we can say that the manual approach to convert OST files into PST format is a time-intensive process due to the need for hands-on effort; you cannot import the data from inaccessible OST file and a series of steps. In addition, there is a risk of data loss and errors. Therefore, it is always better to rely on specialized OST to PST conversion tool such as Stellar Converter for OST for error-free results.