MS Outlook is one of the most popular email clients used for day-to-day communication by organizations worldwide. But like any other application, it isn’t immune to issues and errors. One of the common issues that several users have posted on different tech forums is: Outlook is not receiving emails. This can happen due to various internal and external factors, including internet connectivity issues, mailbox limit has reached, faulty third-party add-ins, and inconsistencies in the data file (OST). In this article, we will discuss some easy to implement methods to fix the Outlook not receiving emails issue.
How to Fix the Outlook is not Receiving Emails Issue?
Here are some simple yet effective methods to resolve this issue in Outlook.
1. Check the Internet Connection
Outlook requires a stable internet connection to synchronize continuously with the mail server. If your Outlook connection is poor or unstable, Outlook won’t be able to send or receive emails. You can check your internet connection by opening a web browser and visiting any website to check that website loads normally.
You can also check the status bar of your Outlook whether it displays Working Offline, Disconnected, or Trying to Connect. If internet connection is the issue, then check your Wi-Fi/Router or contact your Internet Service Provider.
2. Make Sure Outlook is not in Work Offline Mode
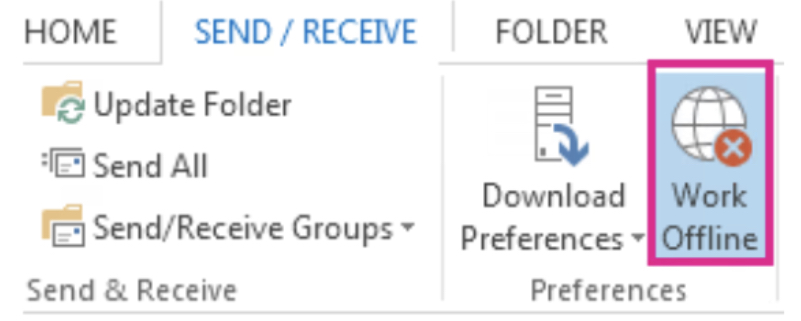
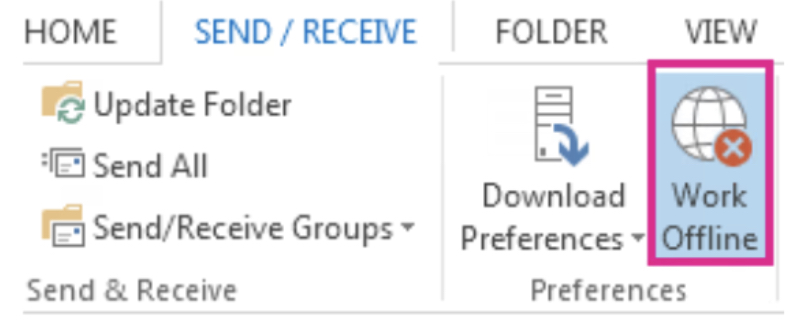
If Work Offline mode is enabled in Outlook, it stops the application from sending or receiving new emails. You can check and disable this mode. Here’s how to do so:
- In Outlook, go to Send/Receive tab at the top ribbon menu.
- Locate the Work Offline button.
- Click on it once to disable it.
3. Check the Spam Folder
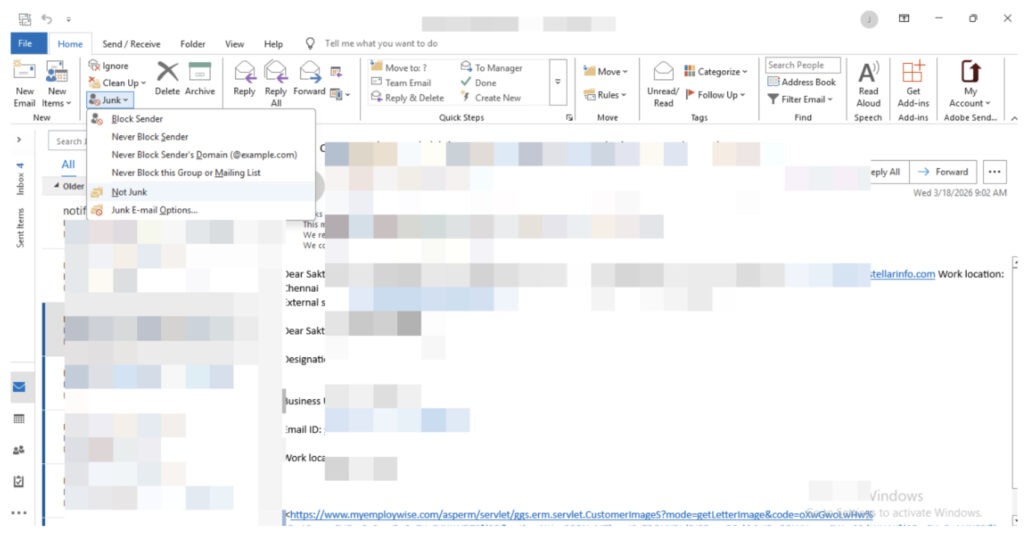
Sometimes, emails are received but mistakenly marked as spam and sent to the Junk or Spam folder. You can check your Spam/Junk folder for the missing emails. If you find them, mark them as not junk by clicking on “It’s not junk” or “Not Junk” from the top ribbon or message header and move them back to your Inbox.
4. Review your Outlook Rules
Outlook allows you to set up rules that automatically move, delete, or forward incoming emails based on specific criteria, like sender name, subject line, or attachment size. So, review and check any rules you have set up and disable or adjust them as needed. Here’s how to do so:
- Go to the File tab in Outlook.
- Click Manage Rules & Alerts.
- Look through the list under the E-mail Rules tab.
- Delete or modify the rule causing the issue.
- Click Apply and then click OK to save the changes.
4. Free up Mailbox Storage Space
If your mailbox is full or has reached its defined storage limit, you may not receive new emails. You can check your mailbox storage usage and free up the space by following the methods below:
- Use the mailbox cleanup tool to find large and old items and delete them.
- Instead of keeping attachments in your inbox, save them to your local device and remove them from your mailbox.
- Empty Deleted and Junk folders.
- Archive old emails.
- Compact your OST file.
5. Reset Inbox Filters and Sorting Options
You can sort and filter your emails by date, categories, or read status in Outlook. At times, you may accidentally apply the wrong filter to your inbox that only shows certain types of emails, such as unread messages, flagged messages, etc. You can check and reset the filter and sorting options. Here’s how to do so:
- Go to the View tab in your Outlook.
- Click on Reset View.

It restores the folder’s layout back to its default settings.
6. Clear Outlook Cache Files
Outlook stores cache files on your device to improve performance and provide faster access to mailbox data. Sometimes, these files can get corrupted and can interfere with synchronization of mailbox items. In such a case, you can remove these files to solve the issue. Follow the steps below to do so:
- Press Windows + R keys.
- Type %localappdata%\Microsoft\Outlook. Press Enter.
- It will display an Outlook folder that has RoamCache folder.
- Open the RoamCache folder. This folder contains several Outlook cache files.
- Delete all cache files.
- Restart Outlook.
Note: Your mailbox data won’t be deleted if you delete the cache files.
7. Refresh Your Inbox Automatically
Outlook uses Send/Receive schedule to automatically synchronize emails from the server. If this option is disabled or the refresh interval is too long, new emails will not appear immediately. You can check and ensure that “Perform an automatic send/receive” option is enabled in Send/Receive settings. Here’s how:
- Go to the Send/Receive tab.
- Open Send/Receive Groups menu.
- Select Define Send/Receive Groups.
- In the window that opens, verify that the Schedule an automatic send/receive every XX minutes option is selected. Also, set an interval of 5-10 minutes.
- Click Close and restart Outlook.
8. Disable Faulty Add-ins
Third-party add-ins are installed in Outlook to improve its performance. However, faulty or incompatible add-ins can interfere with the application’s functionality, causing varied issues. To check if the ‘not receiving emails’ issue is caused by any add-ins, you can open Outlook in Safe Mode by pressing Windows + R, typing Outlook.exe /safe and press Enter.
If your application works properly in Safe Mode, it means that the problem is caused by a specific add-in. You can find and disable the faulty add-ins. Here’s how to do so:
- Go to File > Options > Add-ins.
- At the bottom of the window, choose COM Add-ins.
- Click Go. A list of all add-ins will be displayed.
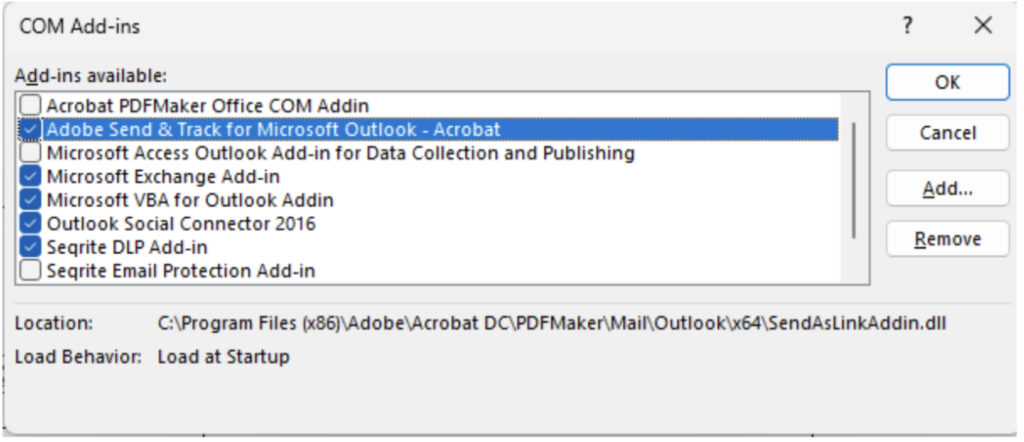
- Uncheck all the add-ins and start Outlook normally.
- Now, enable one add-in at a time and restart the application. This will help you find the problematic add-in.
- Once found, remove it permanently.
9. Create New Outlook Profile
Corrupted Outlook profile can also cause problems with sending or receiving emails. You can fix the issue by creating a new Outlook profile. Here’s how:
- Completely close the Outlook.
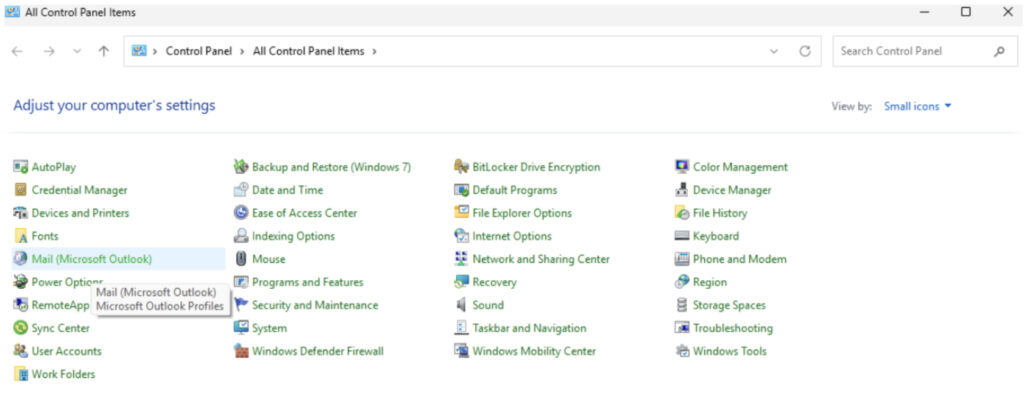
- In the Search bar on your system, type Control Panel and open it.
- Click on Mail (Microsoft Outlook).
- Click on Show Profiles and then click Add button.
- Type a name for your new profile (e.g., “Work,” “Personal,” or “Project”) and click OK.
- Enter the email address in the Email Address field. Then, enter the Password.
- Once successfully configured, click Next > Finish.
- Now, go back to the Mail tab.
- Choose Always use this profile (choose new profile).
- Click Apply and then OK.
10. Recreate OST File
If you are still not receiving emails, this means there are issues with your OST file. It might be damaged or inconsistent. In such a case, you can recreate the file. Here’s how:
- Make sure Outlook is completely closed.
- Locate your OST file. Press Windows + R , type %localappdata%/Microsoft/Outlook in the Run window, and press Enter.
- Rename the OST file or copy it to another location to create its backup. Then, delete the file.
- Start Outlook. It will automatically create a new one at the default location and synchronize all mail items from the mailbox server.
After rebuilding the OST file, check the emails and other items in the newly created file. If you find any missing items, you can use OST to PST converter software, such as Stellar Converter for OST to recover them from the backup OST file. This tool can extract all your mailbox items such as emails, attachments, calendar items, and contacts from the inaccessible or orphaned OST file and save them in a healthy PST file. You can import this file into your Outlook profile and access your mailbox items.
Conclusion
The Outlook is not receiving emails issue can occur due to internet connectivity issues, damaged Outlook profile, and several other reasons. Above, we have mentioned the methods that can help you to fix this issue. However, if the issue is caused by damaged or corrupted OST file, then you can recreate the file after taking its backup. After recreating the OST file, check your mailbox for any missing emails. If there are any, you can recover them from the backup file by using a specialized OST to PST converter software, like Stellar Converter for OST. It helps you to convert your Offline Storage Table file to PST seamlessly. Apart from this, you can also save your converted data file into multiple formats such as, PDF, EML, HTML, etc.